Article
9
'Searching for Support'
Using correct technique to improve the sharpness of your
photos.
By Rob L. Suisted

(Originally published
in New Zealand Outdoor magazine)
It’s
with sadness that I sit down and start this month’s
column. Last night we learned of the tragic death of a friend
Andrew Baldwin, in an air accident near Otaki. Andrew was
a well known and very likeable helicopter pilot and keen hunter
/ outdoors person, from the Kapiti Coast. My sincerest thoughts
are with Andrew’s wife Josie, and children, one of which
is due very soon, and his family.
We
all have fond memories of Andrew’s great sense of humour
and easy going style, and also his generosity. Many of you
will be aware of the work of Steve Collings and the Tararua
Weka Trust in capturing doomed Kapiti Island Weka (from the
rat eradication operation) and relocating them into their
former range in the Tararuas, and initiating a huge predator
control programme to aid their survival. Andrew was keenly
involved from the start, personally donating considerable
helicopter time to the project - flying reconnaissance trips,
supplies and wekas for the team. An enduring memory of Andrew
is of him tentatively climbing into his chopper cockpit with
‘cat’ boxes carefully strapped into the passenger
seats - all with weka beaks stabbing viciously through the
air holes - not your average passengers! Keep flying high
Chap, we’ll miss you!
A
copy of the book printed especially to record the Weka Rescue
by deerstalkers and trampers can be purchased for only $20
from the Kapiti Is. d’Urville Is. Charitable Trust,
PO Box 1558, Paraparaumu. |
| In
this issue I’m keen to focus on stamping out unsharp
images caused by camera movement - an incredibly common fault
in image taking.
I strongly
suspect that it’s the biggest single improvement that
most people can make to their photos, but most people don’t
even realise it’s an issue - they simply accept their
results. It took me quite a while before I realised how insidious
camera movement was to my first photos.
Looking
back thru images I took with my first camera makes me cringe!
They’re reasonable results - exposure is spot on and
composition is nothing to complain about, however, not one
of them would be up to scratch for publication, for the simple
reason that they’re not sharp, reason - camera shake. |
|
There
are two main causes of camera shake.
The most
common is caused by the photo taker hand holding a camera
when the shutter speed is too slow.
The second
is caused by the mechanical vibration of the camera when it
triggers - often called ‘mirror bounce’ it is
caused mainly by the mirror movement in SLR types camera (cameras
that you look through the lens when focusing) when using a
tripod. |

CAMERA
VIBRATION!!! Water dripping from glacier. On first
glance the image looks pretty sharp (this is a small crop
of the original shown here), however the fall of the water
drops are recorded as synchronised squiggles which indicate
the camera was vibrating while the shot was taken even though
the camera was on a large professional tripod! Image sharpness
is lost as a result. Tripods will steady a camera, but they
won’t always stop vibrations! Read the text to find
the solution..
Olympus OM4Ti, 135mm zuiko lens,
Kodachrome 25.
|
| Let’s
firstly focus on how we can control user induced camera shake.
How do
we tell if we’ve got a problem with shake? My guess
is that if you’re not consciously trying to limit camera
shake in your technique then I’d put my dough on your
images being softer than what they should be - simple as that!
For the
less experienced photographer it’s not always easy assess
the sharpness of your images, but this will come with critical
experience. The difference between a beautiful crisp, sharp
photo and a ‘soft’, slightly blurry photo is normally
pretty obvious, however it’s all a matter of degree
- many of your images may look sharp at a casual glance, but
it’s closer investigation that will show that a big
improvement is still possible.
I know,
from continually checking my work, how sharp I should expect
my images to be before they go into my image library for potential
sales. Anything less that pin sharp is not good enough. Merely
viewing prints, or showing slides on a projector, won’t
often show a problem. Your best way is to view slides or negatives
directly with a loupe (magnifying lens), or magnifying glass,
on a light box or similar. By regularly comparing a range
of shots you’ll get a good idea of what you’re
dealing with. |
|
Most
important if you’re hand holding your camera, is the
Golden Rule to never use a shutter speed that is lower than
the focal length of the camera lens.
Simple
really, if you’re using a 50mm lens then make sure your
shutter speed is greater than 1/50th second (you’d therefore
use 1/60th or faster). A 200mm lens would then need 1/250th
second (your wobble is magnified by the higher magnification
of the lens).
This will
insure that your photos are likely to be pretty sharp. Obviously
the faster speed you can use the sharper your photo will be
- the reason is that the image can’t move on the film
as much in the shorter shutter open time.
It makes
me quietly chuckle whenever I hear someone purporting to be
able to take high quality photos by breaking this rule - it
is just not possible. What it tells me is that, yes they can
get acceptable photos, but they’ve never had a close
critical look at the quality they’ve missed.
OK, what
happens when we can’t get a faster enough shutter speed
to use this rule, say we’re in the bush? The solution
is to find a camera support that can provide better support
than our arms can. The obvious and best solution is to use
a tripod, but before we look at these we should look at other
helpful techniques to improve steadiness if you don’t
have a tripod handy. |
|
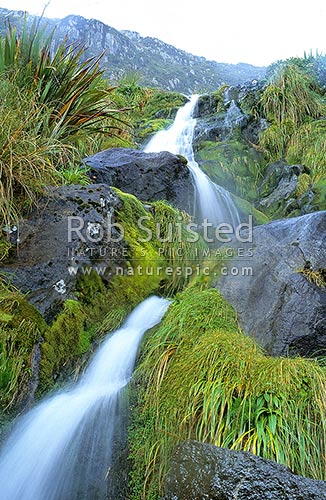
Tripod
country -
to capture the movement of water like this and still
get a sharp image we’re reliant on a decent
camera support. Head of the George River, George Sound,
Fiordland.
Olympus OM40, zuiko 50mm lens, Fujichrome Velvia 50.
|
|
| Having
a suitable film speed to start with helps a lot. If you’re
likely to take photos in the shade, or in the early/late hours
then load up with at least a 400ASA film (400 ASA only needs
a quarter of the light that 100ASA film needs).
Always
think about bracing yourself when taking the snap - get your
elbows into your body if standing; try sitting or kneeling
with your arms locked in like braces; put your back against
a tree; get a rest; or hold the camera against something solid.
All are simple but make effective improvements.
If you’re
really stuck consider placing the camera on something (like
a branch or pack) and use the self-timer function to trip
the camera rather than your finger (this will remove your
wobble). |
|
Tripods
are an essential tool if you’re serious on taking photos.
They allow you to extend technique into areas inaccessible
to hand held cameras, for example slow shutter speeds (say
for photos in dim light, or capturing moving water, or star
trails), or using long telephoto lenses.
However,
they’re a trade off - who wants to carry another piece
of equipment around the hills? Sooner or later you’re
going to need the use of a good tripod and here I’m
going to give you my experience on the dos and don’ts
of a tripod for the hills. Of course, they can also have other
beneficial uses - twice now I’ve erected them square
in the middle of tent flies to stop a dangerous load of snow
collecting during the night, and regularly use them as a third
very stable leg for safety when crossing swift mountain rivers. |
|

Image
of Interest -
“Spectre of the Brocken”. Several weeks ago I
caught this unusual sight high above the Waimakariri River
after a successful days Chamois hunting. The surreal image
is created by the late evening sun projecting my shadow onto
evening mist building in the valley below. It’s apparently
named after a place in Scotland where is occasionally seen.
Olympus OM4Ti, 21mm
zuiko lens, Fujichrome Velvia 50.
|
| Unfortunately
the effectiveness of a tripod is directly related to it’s
weight - the heavier it is the harder it is to wobble obviously.
Obviously we need to get one that is as light as possible,
but to use it wisely to get as much stability as we can. I
own a large heavy professional studio tripod that I can get
unsharp photos from if used wrong, yet my lightweight hunting
tripod gives perfect results if I put a bit of care into the
task. This care normally makes up to the inability to carry
the best tripod. Below are my tips for getting the best results.
All tripods
are not made equal! A $50 plastic-fantastic will not do the
job of a more expensive, fully serviceable, alloy model; in
fact they are beyond comparison, but a cheap one is still
significantly better than nothing. The following is general
advice that should be best practice with any tripod. Most
important is that the 3 feet are located firmly on solid stuff.
This is not always simple, especially in the forest, but try
and get the feet squarely onto rocks or tree roots, not things
like springy soil or moss. It is a must for your tripod to
have independently movable legs as generally you won’t
find 3 evenly placed solid things. Many have a system of leg
braces that mean all legs must be opened out at the same angle
- helpful in the studio - blim’in hopeless in the sticks,
especially on sloping ground. Tripods commonly have a system
of rubber feet that screw in to expose metal points for use
outdoors and these are excellent for a positive grip on rock
surfaces. Next you should be endeavouring to adjust leg height
and angles to make sure that the camera weight is evenly centred
over all the legs. This is often hard to achieve on uneven
ground but it will be much more stable. All tripods these
days have a centre column that can be raised for extra height.
Never raise the centre column if you can help it because they
drastically reduce the effectiveness of the tripod because
you lose the opposing forces of the legs and end up with a
camera on a wobbly pole.
When an
SLR camera takes a photo the mirror (that reflects the image
up into the viewfinder) must jump out of the path of the image
so it can travel thru the shutter onto the film. No matter
how well engineered the mechanism is it will invariably create
vibrations that will soften the resulting image when used
on a tripod. Some top end cameras allow you to ‘lock
up’ the mirror before taking a shot on the tripod, thereby
removing this problem. The effect of ‘mirror bounce’
can be quite devastating when using telephoto lens.
|
|
Check
out the accompanying photo of water dripping from ice. This
photo is reasonably sharp, but the flight paths of the drips
betray the vibration of the camera; notice their synchronised
wiggles. It should be noted that this photo was taken with
a large, expensive, professional tripod, and the camera used,
an Olympus OM4Ti would be one of the smallest and lightest
about. What it illustrates is that tripods are pretty good
at holding a camera steady, but, they are generally not good
at stopping this vibration! So how can we beat this problem?
Well, the answer is quite simple I’ve found but it took
a few years of careful investigation (especially from using
much heavier medium format cameras). I’ve found that
any vibration created by the camera typically takes about
1 second to die down after the shutter is pressed, therefore
if I’m using a shutterspeed shorter than that time I
will need some sort of vibration dampening. It’s interesting
to note that handheld photos generally don’t suffer
from mirror bounce (just camera movement) because our hands
and arms work as very good vibration absorbers, therefore
I’ve come up with a very useful rule of thumb when using
tripods, to beat the vibration problem as shown in the photo.
Now if I’m taking a photo with the shutter speed of
1/2 second or faster (e.g. 1/4, 1/8th, 1/15th, 1/30th........second)
then I will hold the camera on the tripod and gently press
the shutter button. The idea here is to apply gentle downward
pressure towards the centre of gravity of the tripod, being
VERY careful not to wobble the tripod (note that this increases
the importance of having solid ground below the 3 feet). If
there’s any concern about wobbling then don’t
use 1/2 sec. The idea is that the tripod will stop camera
movement and your downwards pressure soaks up vibration. Next
bit of the rule is to stay away from shutterspeeds of 1 second,
or 2 seconds in duration if you’re using a tripod. Shut
the aperture ring down a few stops and go for a longer shutterspeed,
4 seconds or longer, and don’t touch the camera or tripod
(you need a cable release to trip the shutter). Logic for
this is simple - if the vibration is about 1 second in length
then it will only be vibrating for a quarter of a 4 second
exposure which means the image will be sharp. So to recap,my
rule when using a tripod is to carefully apply a vibration
dampening weight to the camera when using shutterspeeds of
a 1/2 second or faster; don’t use shutterspeeds of 1
or 2 seconds; let the camera sit alone on the tripod and trigger
it with a cable release for shutterspeeds of 4 seconds or
longer. |
| 
Moon
over sea -
Of course a tripod is essential in capturing such an alluring
image of the moon relected on a rough sea at twilight.
Canon
EOS, 17-35mm lens, Ektachrome E100VS.
30 secs @ f8
|
| So
what would I recommend if you were to buy a tripod tomorrow
you might be asking? Well as previously mentioned a lot depends
on price. I initially tried to get away with a compact model
that packed down to about the size of a 3’D’ sized
battery torch - bloody hopeless for anything more than a spotting
scope. Problem was it was so light and had so many adjustable
bits to fold up so small that it just wasn’t rigid;
also it stood about an inch shorter than long grass or tussock,
very useful that, NOT! Next I persevered with another cheap
but promising model that seemed OK till I stumbled across
a real tripod - the difference was embarrassing really, especially
as it was the same size and weight. The tripod that I’ve
been lugging around the hills for many years now is the baby
of the Manfrotto (Bogen) range, the #190B (no I don’t
get royalties for saying this, but I’m happy to trial
any gear they think I might have missed. Note also that serial
numbers have a nasty habit of changing between countries).
These are made in Italy and are excellent value. They’re
constructed mainly of alloy and are fully serviceable for
maintenance or cleaning, and could just outlast yourself.
You also get a choice of the type of head you want on it.
The head is the bit on top that your camera attaches to and
is adjusted to point the camera as needed.
For
most people I’d recommend that the best tripod head
for our use is the ball head. It works like a ball joint that
can be loosened off, adjusted to the correct angle, and then
tightened to hold it in place - all adjustments are made in
one go. |
|
The
best choice ball head for the #190B would probably be their
#352, or #352RC (this one has a quick release plate that attached
to your camera and clips quickly to the tripod head when needed).
Other types of heads have a 3 way design - you adjust the
up-down lever, then the side to side lever, and then the camera
tilt lever to set the photo up; good for the studio, but not
really in the hills. With good quality tripods you can generally
mix and match different brands of legs and heads to get your
preferred combination.
You’ll
want to get an idea of cost: the Manfrotto 190 legs are about
$200; the ball head around $80. Not a bad cost for something
that should last the good part of a lifetime and is pretty
robust. All up weight is around 2kg. Other brands to check
out include: Slik (have a large range from adequate to serious,
are somewhat cheaper, but worth a look as their products seem
to be developing all the time); Benbo (these are a unique
UK design to cope with difficult situations - they’re
either loved or hated - not cheap though. I’ve heard
it said that “their legs are harder to control than
a pissed persons!”); Velbon ; Gitzo (probably regarded
as the Rolls of tripods and have just developed a super light
graphite leg model if you’ve got a grand or so to spare).
These brands are not generally available from most photographic
shops, but they will be able to get information and pamphlets
for you. Failing that, all are generally available from the
larger photo retailers in the main centres via mail order.
|
This
article and images are copyright to Rob L. Suisted - Nature's Pic
Images. All rights reserved.
|