Article 7
'The Point and Pull Tool'
Getting to grips with the Point
& Shoot camera
By Rob L. Suisted

(Originally published
in New Zealand Outdoor magazine)
| In this article I’m going
to give some advice on how you can make improvements to your
photos if you’re using a simple point and shoot, instamatic
type camera. Firstly
though, I hope the festive period was good for everyone? For
me it meant a long overdue trip to the West Coast and a chance
meeting with one of the world’s foremost wildlife photographers.
|
|
It all started with Xmas Eve next to the beautiful Heaphy
River on the Heaphy track with some very 'hard-case' people
from Dunedin, while I was in photographing the amazing red
rata and Nikau palm forest.
Next was a flight in with
James Scott into the Douglas River, Karangarua, to chase the
Tahr for a week of glorious weather. No big trophies were
taken or even seen this trip, but the photogenic nature of
this spot more than made up for it; ‘photography was
the winner on the day’ as they say!
Then a few days fly-fishing
with the famous Paul van Klink (or ‘Paulus Andreas van
Klinkenhoffen’ for short) confirmed that he still has
the knack of casually extracting lots of huge brown trout
from little pools, while he’s on holiday from extracting
large 12 pointers out of the scrub. Haast made the call and
I cruised around taking it’s photos for a while before
packing up again for North Island, enroute having a chance
meeting with Hiroya Minakuchi, one of Japan’s (if not
the world’s) foremost wildlife photographers at Kaikoura. |
|
It
was certainly a privilege to spend a day with Hiroya Minakuchi
in Wellington. He runs a Japanese Geographic type magazine
called ‘Sphere’ that focuses mainly on high quality
images of whales, dolphins and marine life. To view his work
is truly inspirational. Hiroya travels the world for 6 months
of every year shooting film and video.
One thing of interest was
that he uses relatively old Canon manual focus equipment for
all his stunning wildlife action shots. He says that auto
focus is not fast enough! He showed me one shot of a large
Manta ray that was jumping clear of the water. ‘They
only jump once’ he said. I found out that he often shoots
by reflex. His technique is to estimate the distance, manually
focus the lens by instinct, and snap the shot all in a split
second - sometimes without even looking through the viewfinder!
For this shot he had been out in a boat and had just seen
the front fins of the Manta ray break the surface maybe 50
metres away. Up came his 300mm lens by instinct and a truly
amazing photo was created! Hiroya, who is in his forties,
says regretfully that he cannot maintain the speed required
for this technique as he could when he was younger!
|
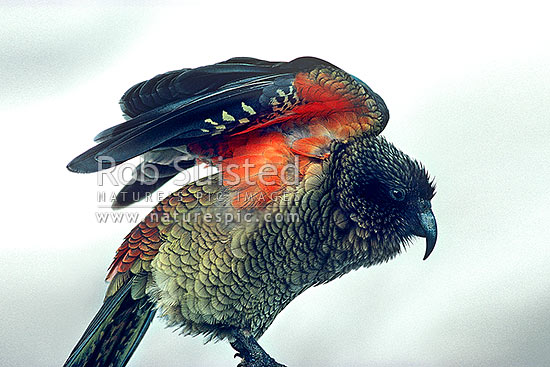
Kea (Nestor
notabilis) having a morning stretch. Canon EOS, 400mm lens,
Kodachrome 200.
|
| We
also spoke of a friend of Hiroya’s, another well-known
Japanese wildlife photographer, Hoshino, who met with an unfortunate
end. Hoshino was known for his pictures of large mammals such
as bears. He had spent a long time photographing brown bears
in North America and his knowledge and familiarity of their
behaviour allowed him to get very close to his subjects. However,
he was on a trip to Russia to photograph brown bears also
when the unexpected happened. Although the bears were exactly
the same species as in America, Hoshino was not fully aware
that their behaviour was very different for two reasons: firstly
they often fed on food scraps; and secondly they were hunted.
One night Hoshino retired to his tent, as he preferred the
solitude to that of sleeping in the hut with the others. In
the middle of the night his colleagues were awoken by fearful
screams as a bear ripped into his tent and attacked him. Apparently
the bear was shot later and most of Hoshino was recovered
from it -a rather sobering story for the Wildlife photographer!
I think about the most dangerous
situation I’ve been in recently was a Himalayan Tahr
kid that accidentally launched itself off a cliff 50m above
us. |
|
Anyway,
the idea of this article is to provide some advice on how
to get the best out of your everyday, ‘run of the mill’
point and shoot camera (or ‘Point and Pull Camera’
as a good friend says).
I’ve had a lot of readers
approach me and ask questions about improving their photography.
Many of these people only owned small instamatic type cameras
and felt they had little scope to improve their photography
- Wrong!
Of course there are certain benefits and limitations
with point and shoot cameras.
The benefits are of course ease of use, and
their lightweight compact nature; heck some of them are smaller
than the light meter I carry.
But, the biggest improvement in your photography
is likely to come from your understanding of their limitations.
These disadvantages are really in two areas; lack of manual
control over the camera when you need it, and small lenses
that may be restrictive in the amount of light they allow
through (generally zooms).
|
|

Paul van
Klink with another awesome sea run brown trout hen before
it was released back into secret river #7, West Coast. The
photo was taken in very harsh direct sunlight so a burst
of fill in flash was used to reduce the harsh shadow on
the face and a long focal length lens was used to crop in
tightly and reduce the background. Canon EOS, 135mm lens
with polarizing filter, Ektachrome 100S, 1/125th sec @ f5.6.
|
|
When I refer to manual control over your camera, I’m
referring mainly to your ability to influence the camera’s
light meter.
In my recent column dealing
in depth with Exposure control (Article
#4), I explained how camera light meters are fooled by
very light or dark subjects - like white snow when you’re
skiing (ever notice how snow always seems to come out a sickly
grey rather than pure white?). You have to help the meter
out in these situations and you’re often limited in
you choices. What’s needed is for the film to be slightly
overexposed for light subjects and slightly underexposed for
dark subjects.
Fortunately many manufacturers
include a ‘Backlight’ button that can be a real
blessing. Essentially this button will instruct the camera
to overexpose the photo by around +1.5 stops. “When
do I use it though?” I hear you ask. You need to use
this button every time you have a photo that consists largely
of very light tones (such as snow), or when you subject has
a background that is a lot brighter than it.
Another way that you can vary
the exposure on your camera is by adjusting the film speed
dial to influence the camera’s light meter. Many P&S
have DX coding which automatically sets the film speed off
the film cassette (that’s what the black and silver
checker pattern on all rolls of film are), but many give you
the ability to set the film speed manually. If you can adjust
the film speed then this can be a bonus.
If you were using 200ASA film then you could
adjust the film speed setting to 100ASA and that will force
the camera to overexpose by one stop (just what you need if
you’re skiing because of all the bright toned snow).
Similarly, if you adjusted it to 400ASA, it will underexpose
one stop. Remember though to adjust it back after the shot.
Read the previous ‘Exposure
Control’ column if you’d like to fully understand
this aspect. |
|
Because
P&S cameras tend to have less well developed exposure
meters and less manual control it is far more preferable to
use print film rather than slide through them as any exposure
variations can be ‘ironed out’ when the negatives
are being printed onto paper.
While on the subject of film, I strongly urge
you to go for a faster film than 100ASA. Print film technology
appears to be increasing at great speed and some of the faster
films are quite outstanding. I recommend that you should commonly
be using 400ASA film in your P&S, especially if you’re
taking it into the hills with you, and certainly if your camera
is a zoom model. I know a lot of people will argue that using
400 is too grainy, but this comment is irrelevant now - have
you seen the results lately? And bearing the added advantages
in mind I wouldn’t use anything else - and I don’t
in my trusty old Olympus XA (the tried and true grand father
to current Olympus P&S models).
Next, most P&S are rather limited when
it comes to lenses. Generally the fixed focal length lenses
are no problem, but the zoom models start to get really limited
in the size of the aperture. A 38mm to 115mm looks great in
the shop and is often very handy, however it is not often
explained that most P&S let in very little light at their
maximum zoom range. The minimum aperture may only be f11.
Compare this to a normal SLR zoom which is typically f5.6
and you’ll see its 2 stops slower (that means it only
lets a quarter of the light through in comparison!).
Here you can see that you’re going to
greatly benefit from using a faster film speed (say 400ASA
instead of 100ASA), and only using the maximum zoom on bright
days. Most people don’t also realise that with the lens
zoomed out camera shake becomes critical and you can really
do yourself a favour by concentrating on steadying the camera.
|
| 
Dramatic
clouds over Lake Douglas, Karangarua River, Westland. Bronica
ETRSi, 150mm lens with polarizing filter and graduated neutral
density filter. Fujichrome Provia 100
|
|
One technique that P&S users should get into is using
the auto focus and exposure lock that most cameras have when
you half press the shutter button half way down. Most cameras
will auto focus only on subjects centred in the middle of
the screen. Likewise most of the exposure metering is likely
to be taken in this area also.
However, most times we don’t
want to place our subject smack in the centre. A handy trick
to use is to put your subject in the centre of your camera
screen (thereby allowing it to focus on it), push the shutter
button down half way (or until a green light or what ever
lights), hold your finger there, recompose the picture as
you want it and then fire away. This way you are sure to have
the subject in focus and exposed correctly even though it
is off centre.
One bonus is that most P&S have a built
in flash. This can be really handy but it is important to
understand its limitations. Most people just turn the flash
on and blaze away - no problem if you’re at a party
where the subjects are close and well exposed and the background
goes dark black because the flash light is not powerful enough
to reach that far.
This is a problem though when you’re
photographing say a fireworks display that maybe a lot further
away. The camera uses a fast shutter speed in expectation
that there is a close subject that the flash will illuminate.
This is not the case and the photo will come out blank. What
you are trying to capture is the ambient light of the fireworks
and you will need turn the flash off if possible and let the
camera use a longer shutter speed (on a rest or tripod of
course).
Flashes are very useful things during the
day though. If you are taking shots in bright sun you will
notice the dark shadows that are about. Film will capture
those shadows even darker that you see them so it is good
to try and destroy them when possible, especially when taking
photos of people as big dark shadows around eyes is not attractive
(well, most of the time). I would suggest that you could improve
almost every photo taken in this situation by turning on the
fill in flash. What this does is to pump a little extra light
directly into the subject and lighten the dark patches. Don’t
worry about ‘red eyes’ from the flash, as the
subjects’ pupils should be closed right down because
of the sun.
With every camera lens we should take care
not to take photos with any sunlight falling on the glass
as it tends to scatter around inside and cause a bad reduction
in the contrast of the shot - loosing you any deep rich blacks
and crisp whites. This is especially true of P&S cameras
because they often don’t have the same level of multi
coating on their lenses as SLR cameras do; multi coating,
the coloured film (normally blue, purple or green) on lenses
is there to control the transmission of light through the
glass. Therefore it is useful to use the old rule of thumb
by shooting with the sun over your shoulder when possible.
|
|
A bonus is that many P&S
cameras are now available that claim to be waterproof. This
is a definite advantage in Fiordland or if you take the occasional
shallow underwater photo, say of a trout being released. They
have the ability to bring an exciting new dimension to your
photos, however a word of caution in this area as manufacturers’
claims regarding waterproofness of their cameras can be highly
optimistic, and I’d hate to see good cameras drowned
without checking whether they’re up to it first. If
you are to use them underwater I’d suggest going for
a faster film (at least 400ASA) and you’ll probably
get better results by leaving the flash off because it is
relatively close to the lens and this causes light scatter
off all the minute particles suspended in water; the result
can look like a snow storm. Also note that if you’re
holding a camera underwater and aiming it without your head
in the water then your aim will probably be a little wonky
due to the refraction of the image above the water.
APS camera or a normal 35mm camera? Many of
you will know of the new type of film and cameras that were
introduced a couple of years ago called Advanced Photo System
(APS). This system offers a dummy proof film system that uses
drop in film cartridges that can be swapped mid roll. The
APS negative is actually a lot smaller in size than the normal
standard 35mm negative but apparently new technology gives
it similar results as 35mm film. Because of this the camera
can be made slightly smaller. You might like to consider this
system if you’re carrying a camera in the hills, however
I would point out that developing may not be as readily available
as 35mm and that the APS film technology is starting to become
available in 35mm film types. In the end which system you
select is up to personal choice but it is clear that for the
P&S user the selection of APS is a lot more straight forward
that the SLR user who may already have a considerable investment
in 35mm gear. All I recommend is that you sit down and wade
through the pros and cons when making a decision, not with
a salesman trying to ram one or the other down your throat.
(Post script - APS seems not to have become very popular,
and of course digital is now an important consideration also.)
An interesting facility you
get on some P&S cameras is a panorama option. This produces
a long thin image. There is nothing special here, all it does
is use the middle of the negative and blow it up several times
so that it covers the size of 2 prints. For this principle
to be really useful it normally requires a much wider lens
than that normally built into such cameras, however this can
be an interesting tool to experiment with and I’ve seen
some really interesting images result.
|
| 
The slow
flowing Oparara River, Karamea. Here I used a long shutter
speed to detail the slow movement of the water, and a polarizing
filter to remove the reflections off the water and to deepen
the colour saturation of the wet vegetation. Olympus OM4Ti,
24mm lens, Fujichrome Velvia 50. 2 sec @ f16..
|
| Contrary
to popular belief, it is possible to use lens filters on P&S
cameras. With P&S cameras, the light meter is normally
one of the odd little gizmos that sit up above the main lens
(there are normally others also for the auto focus). As long
as the filter (say a polarizer, or warm-up filter) you’re
placing over the main lens also covers the light meter you
will generally have no problems (as it will cut the level
of light evenly for both).
Fortunately
if you own filters already then they’ll probably be
more than large enough to cover both the main lens and light
meter.
A quirk of P&S
cameras is that they usually have a parallax error but it’s
normally corrected for normal shooting distances. This is
because most viewfinders are offset to the side of the main
lens. If you’re taking photos of people at normal range
they’re normally pretty good, however if you are photographing
closer then the camera will normally shoot slightly to the
right, and might shoot slightly to the left if you’re
taking landscapes; normally it’s not a problem though.
|
|
People
often ask me if I can recommend a P&S camera that they
should buy. While I am not fully familiar with the full range
of P&S cameras (believe me there are many) I have been
recommending people to check out the range of Olympus Mju
cameras. While I’m not going to recommend a particular
brand or model I am willing to promote this brand as one you
should make comparisons against - for price, features and
results. I’ve been really impressed with the latest
Mju II as it is extremely compact and packs most of the features
you should require and it has the bonus of a reportedly very
good f2.8 aperture lens (this allows considerably more light
through than many of it’s rivals). It has a fixed 35mm
lens that is pretty standard for P&S, but there are zooms
in the range also, if you are so inclined.
Well that just about covers
it. As for the photos with this column, I thought it would
have been a bit boring to fill the pages of pictures of P&S
cameras. Also, who knows if they’ve been shot on a P&S
or a SLR, so I’ve just included a few of my holiday
piccies to keep your attention; I hope you enjoy.
|
This article and images are copyright
to Rob L. Suisted - Nature's Pic Images. All rights reserved.
|