Article 3
'The Gear for Deer'
An introduction to big game photography
By Rob L. Suisted

(Originally published
in New Zealand Outdoor magazine)
I often wonder about the hunting
game......I wonder what it is that pulls deerstalkers and hunters
to it? How can it be that we willingly continue to put ourselves
into harsh country and trying conditions in the search of big
game?
|
| The
civilised non-hunter might have it as a guess that we do it
just for the kill, and I can't begrudge that guess, as wrong
as it is. I often wondered myself, how important the kill
was to my motivation? The motivation to spend two long weeks
stuck under canvas in wettest Fiordland, or the motivation
to perch in a tent high in the snowbound Southern Alps. Is
it all just for a chance to put a distant hole in an animal,
and see it drop? I know it's definitely not that and proof
has come in several ways. The most certain of which is from
my photography of the same animals that I hunt.
For me the motivation comes
clearly from the patient stalk needed to outwit a wild animal
in it's own environment, a wild animal with well developed
senses. |
|
To successfully stalk close enough for a good photo is an
incredibly satisfying challenge and I urge you to try it.
I'm writing this column with that in mind. Secondly, if you're
a keen hunter and amateur philosopher and often ponder questions
about our sport I also urge you to read Aldo Leopold's (that
famous American hunter and 'father' of the modern conservation
ethic!) book 'A Sand County Almanac'. Right, I'll leave the
heavy stuff to him and get on with it!
When I was too
young to get my firearms licence but old enough to be keen
to get into the scrub, I recall that I regularly thumbed through
old copies of NZDA's magazine 'Wildlife'. It was the magnificent
photos by guys like Gordon Roberts and Lance Barnard that
really stand out now.
|

Sambar Hind in Flax, Manawatu.
300mm lens f5.6 @ 1/250th sec, Kodachrome 200. Suisted.
|
|
I guess they're both probably
equally to blame for the redirection of a promising young
New Zealand fast bowler into the Tararuas with rifle every
summer (and rest of the year as required) as soon as the local
Arms Officer completed the paper work? In the following years
I wondered with awe how they managed to do what they did -
I was having trouble getting within .270 range. It goes without
saying that the fact that so few people have managed to achieve
the same results that these guys have is testament to their
skills? My initial attempts at photographing game animals
came about on the odd weekends were I had shot one animal
and had realised that more venison was not a viable option
in the pack space department. The first results were of course
rather miserable - they had more blur than the famous 'Freaney
Moa' photo and deer were harder to spot than the ball competitions!
|
|
I'm glad to say this has finally
changed somewhat, and I'm very happy to report that it is
due mainly to the lack of knowledge in the photography section
rather than the odds of actually meeting the odd deer close
up. I now know that good wild animal photos are achievable,
but they take a good deal of dedication and learning - fortunately
though we all seem to possess a good deal of keen. Here's
the low down on what I've learnt about the basic requirements,
especially equipment-wise, in the years since (there are of
course still many cock ups that contribute regularly to the
odd lack of quality results, but I'll leave those till near
the end to hold your attention). There isn't room to go into
intricate details on stalking techniques in this issue suffice
to say though that they are not much different from the ones
you already employ with a rifle. |
|
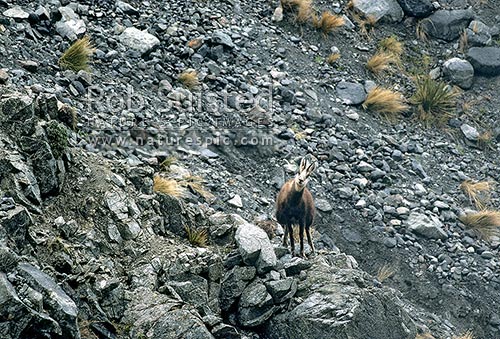
Chamois
lightening the load for the get away - I put this one in
for interest. I'm not sure if it's pissing itself from laughter
with me crawling down a snow fed river using the water movement
to disguise my approach in the open, or whether it's just
nervous? Kaikoura mountains. 400mm
lens f5.6 @ 1/500th sec, Kodachrome 200.
|
|
THE ENVIRONMENT.
Think for a
moment about the typical areas you hunt deer in, and the typical
times of day you're most likely to spot them. You'll soon
conjure up a picture that is either very hostile to the expensive
piece of electronic camera gear you're lugging about, or the
light levels are very poor, or both - either way things are
rather trying, but they're not hopeless. It just means that
we have to think a bit about optimising our gear and approach
to handle these conditions. To start with, lets consider some
of the crucial requirements.
FILM.
Because our quarry is normally encountered in the bush, or
active in the open only in the morning or evening, we therefore
typically contend with low light levels so film choice is
crucial - we must use film with as much sensitivity as possible,
the faster the better. Forget the concern that a faster film
produces more grain and is therefore less desirable. We're
talking here about the difference of actually getting a photo
or not; if it still concerns you once you have success then
you can work on points for style, but the quality of the faster
films today is remarkable, especially if you stick with colour
negative (print) film. There is one film that stands out clearly
as an option that you should consider. I recommend Fujicolor
Super G 800 as a starter. This film has been raved about since
it's introduction several years ago and is the film of choice
for a large number of professional sports photographers coping
with big lenses and often poor lighting. Being a print film
is a bonus as any minor exposure mistakes or variations are
easily corrected in developing. If the 800 ASA rating is a
bit confusing then understand that it only takes half the
amount of light than 400 ASA film to make an image. 400 ASA
takes half what 200 ASA requires, and 200 ASA half what 100
ASA needs. Hence, 800 ASA is capable of taking the same image
as 100 ASA but with a 1/8th of the available light! You will
be likely to find this film only in camera shops but it is
relatively easy to get your mitts on. The cost will be a few
dollars more because it's not as common (and probably the
extra silver required in the film), but offset this against
the cost of the ammunition you'll eventually save (well that's
the theory, ain't it?).
Manual focus or Auto focus
cameras? Scope sight
or open sights, you know the type of argument.......I can
see distinct advantages with both systems. For example, the
older manual focus lenses have advantages, as they tend to
be built like proverbial outhouses and stand up to the outdoors
a heck of a lot better that a lot of the new plastic constructed
auto focus equipment. Auto focus can have good advantages
with speed and accuracy of focus especially in open country,
but the down side can be the pits when your camera decides
to focus up on the single blade to grass that cunningly conceals
your presence from the monster stag about to do a runner before
your eyes. |
|
My advice is not to worry too much and simply
get practised with what you have - big game photos haven't
remarkably improved because cameras can focus for us.
LENS SELECTION.
As a rough guideline I would consider
that the following lens focal lengths are best. In the bush
a 200mm, or at the most a 300mm lens is optimal. Out on the
tussock tops a 400mm lens would become the desired minimum
To give you an idea of focal length compared to magnification,
a 50mm lens is the rough equivalent to the normal eyesight
perspective. So, a 200mm lens is roughly four power magnification
and a 400mm lens is about eight power. You might wonder why
the highest magnification is not favorable in all situations?
Surely the bigger the animal looks in a photo the better?
There is a compounding problem that we face here. As a lens
increases in power it generally transmits less light (unless
you've got big bucks to fork out on one of the monster top
of the line models that weigh too much to be of use anyway)
and we need all the light we can get to the film while photographing
in low light e.g. in the bush. Secondly, and very importantly,
is that as the lens magnification increases you need faster
shutter speeds to stop your camera wobble from blurring the
image. So a more powerful lens not only lets less light through
(and gives you a slower achievable shutter speed as a result),
but it also requires a faster shutter speed to operate with
good results - spot the problems? Fortunately, we can generally
use a smaller telephoto lens in the bush because the likelihood
of approaching close to animals is higher, and this helps
to diminish the above problems. Also, out in the open tops,
or in clearings, we have a heck of a lot more light available
to us to easily use a longer lens at the much higher shutter
speed required e.g. a sunny day might easily have 5 stops
more available light (that's 32 times) than the same day in
the bush! A relatively new development that I am currently
using is the newly developed 'Image Stabiliser' lens from
Canon. It's a 75-300mm f5.6 zoom lens that contains technology
developed for camcorders. It uses a computer that actively
moves a lens to counteract any minor camera shake you produce.
The manual suggests that you can use the 300mm lens handheld
down to around 1/30th sec, rather than the recommended 1/500th
sec and I'm very impressed with the results, it's especially
handy in the bush. Considering the harsh, wet, conditions
we generally encounter I'm still being rather cautious with
it. As interest in develops I think we'll start seeing many
more lenses with this option, and at relatively good prices
too. Stay tuned.
TELECONVERTERS.
Most of us have probably heard about
teleconverters. They're a small gadget that we can put between
our lens and the camera to double its magnification - excellent...who
needs to get close? Hang on a minute, the potential benefits
of this are great, BUT, and it's a big 'but', there are serious
limitations that you must understand before you rush off and
splurge out on one of these gizmos. How do they work? |
| 
Wild red deer hind and
fawn (Cervus elaphus), Tararua Forest park
Canon EOS, 400mm lens f5.6 @
1/500th sec, Kodachrome 64.
|
| Essentially
they enlarge the image that comes through your lens and onto
the film in your camera. A 2x teleconverter will enlarge the
image to four times the area of normal (like moving a projector
back further from the wall) so that your film is only seeing,
and capturing, the centre quarter which equates to a 2 times
increase in final picture size. Unfortunately the down sides
are that the camera is now only capturing a quarter of what
is entering your lens onto the film, and that means only a
quarter of the light, i.e. a 2 stop reduction in light! Add
this also to the need to double the shutter speed if you want
to stop image blur from the increased power of the lens and
you'll see that teleconverters become downright useless if
we're in the bush, or low light! Do you follow? Another problem
is that we are only using the centre quarter only of your
lens and then putting it through a set of lenses in the teleconverter
and hey presto you've got the possibility of significant deterioration
of image quality unless you're willing to fork out mega bucks
on a top level converter and matching brand lens to suit.
Don't be put off though! I regularly use them and they are
beneficial if used within their limitations. My main use is
on sunny days on the tops where there is heaps of light about
and animals can be harder to approach closely.
|
|
For
instance, if I use a 400mm f 5.6 lens and chuck a 2x teleconverter
on I get a whopping 800mm (16 power) lens, but it's minimum
aperture is f11. To hand hold the lens I will require at least
1/1000th sec. shutter speed. To get this on the brightest of
days, with an f11 aperture, I will need to use at least 400
ASA film. You can see the problems if it clouded over! As you'll
see, this is where a good tripod becomes essential. I recommend
that if you are keen to buy a teleconverter that you make sure
it is a seven element (lens) model, not an El cheapo 3, 4 or
5 lens type - it should say it on the side. It is reasonably
easy to find these second hand for under a hundred bucks e.g.
Tamron (just check that there's no fungal growth on the lens
surfaces and you can't spot any scratches etc.). I suspect that
this is often due to the owners disappointments in performance.
Disappointments that are probably more as a result of expecting
miracles than the optical quality? Also note that auto focus
generally doesn't work with converters. Techniques for steady
photos. A rule of thumb is that we shouldn't hand hold a lens
at a shutter speed that is slower than the reciprocal of it's
focal length (e.g. a 500mm lens needs at least 1/500th sec).
By now it's clear that we are highly likely to have to run off
photos at shutter speeds a lot slower than are recommended to
stop image blur. If we employ a few techniques, or tools, to
aid us, it can often be no problem. |
| 
Wild Chamois in fresh
winter snow (Rupicapra rupicapra), Lewis Pass, Southern Alps.
Canon EOS, 400mm lens f5.6 @
1/500th sec.
|
|
TRIPODS.
The most obvious is a good tripod. Note
that there is a big difference between a tripod and a good
tripod, and unfortunately it is also relative to weight which
doesn't help us too much, e.g. the heavier it is the less
it will move, or wobble. Even on a tripod a big lens can suffer
from 'mirror shake' by the action of the camera mirror bouncing
up when a photo is taken, so if your camera has the ability
to lock the mirror up it would be good to utilise it whenever
possible when using long focal length lenses. Monopods are
another tool that you'll see regularly used by sports photographers
with their big lenses. Next, as hunters we can all think of
a few tricks to help us steady a rifle. The obvious ones are
firmly holding the camera on top of our day bag, or resting
against a tree etc., or in the very least tucking our elbows
into our hips or onto our knees. I have learnt many useful
body posture and breathing techniques from target shooting
that I use regularly when using big lenses. Try approaching
a target shooter at your local branch for advice. All these
methods will help get a sharper image but there is nothing
that can really make up for a fast shutter speed. Therefore
I strongly recommend that if you've got the chance you should
run off as many photos as possible as one surprisingly good
photo always seems to pop out of a hopeless situation.
GEAR PROTECTION
& CARRIAGE. I always carry
a camera with me when hunting. I've made up a special chest
harness that supports my camera in a similar way to wearing
a day bag on your front. The idea is that it takes the weight
off my neck, protects the camera, and importantly provides
very quick access, via a quick release clip, when needed.
I've also taped up all my cameras with black insulation tape
because they certainly get their fair share of knocks and
scratches. You can readily remove any sticky marks left behind
with alcohol - we're not talking topshelf here. Pay attention
to dust (especially sand!) as it readily gets into camera
and lens mechanisms and is hard to clean out and can be highly
abrasive. It is good to wrap gear in plastic while in the
bottom of day bags and packs. Moisture and humidity are silent
enemies. |
|
Directly they
can affect the electrics in cameras, but humidity is the key
cause of fungal growth in your expensive lenses. The fungi
get into your lenses by minute air borne spores and they grow
on the inside lens surfaces by eating the special multicoatings
that are put on to control light reflections! You can spot
infected lenses by carefully holding them up to the light
and looking for very fine cobweb like growth. So be sure to
let your valuable lenses dry out well (say in the hot water
cupboard) when you get back from a trip into our humid forests
etc. I keep all my lenses in a big plastic container at home
with a big jar of reusable silica gel (moisture absorbing)
crystals that you can buy from the chemist.
Practice, communication,
and a bit of good luck.
As with anything, practice helps things go smoothly when the
heat is on. Familiarity with gear is the key. A good mate,
a Mainlander of Dutch lineage, recently took some great photos
of a couple of chamois perched high up in the Kaikouras. His
mate was over the moon, the animals were 40-50 metres away
with a great backdrop. The photographer didn't seem to be
so excited, arguing that they weren't really that close, only
to find that he had forgotten to zoom his lens from 70mm out
to the 300mm he could have been using! Try chasing feral goats
with the camera they can be good practise. Returning from
a weekend trip into the Rimutakas I eagerly rewound the film
in my camera after taking some good photos of a hind on a
slip only to find I'd never put any into the camera! This
summer, while on a trip to Westland we traveled up and over
a high saddle to catch a lone chamois feeding contentedly
just 20 metres below us on the other side. All the time in
the world was available as the wind was strong, constant and
favourable. Pointing out the animal to my mate who carried
the rifle, I carefully crawled over with the camera. Focusing
on a great shot I waited for the feeding animal to turn side
on for the first photo. Bang, it fell over! 'Gosh' I said,
'That was the whole point of the trip for me, was there any
rush?' Well, good luck if you're keen to have a crack at this
difficult pastime. Initial successes might be slow coming
but you can be sure that it will be every bit as satisfying
as the time you finally tipped over your first deer. And you
can be certain that they do get easier. Anyway, the natural
progression is that you'll be taking images that are keenly
sought after to illustrate magazines like this. Where would
they be without your efforts?
|
This article and images are
copyright to Rob L. Suisted - Nature's Pic Images. All rights
reserved.
|